Communicating with ActiveCampaign using the API and Webhooks

Overview

Essentially communication between ActiveMember360 and ActiveCampaign can be achieved using two methods either by the ActiveCampaign API or by webhooks.

API

API stands for Application Programming Interface.

ActiveMember360 uses the ActiveCampaign API for two purposes:

  1. To provide ActiveCampaign with the latest data. For example, if a tag is added to the logged in user within WordPress ActiveMember360 requests using the API that a tag be added to the relevant contact in ActiveCampaign and receives as a response whether this operation was successful or not.
  2. To pull data from ActiveCampaign for use within the WordPress site. For example, upon login ActiveMember360 requests from ActiveCampaign all data related to the contact email address associated with the user who is attempting to login and receives all ActiveCampaign contact data as a response.

In both cases ActiveMember360 makes a request to the ActiveCampaign API and will then receive a response.

So, think of an API request and response as the software equivalent of using directory enquiries. You ask for a phone number for someone and the response by the operative provides that.

Webhooks

When using a webhook no request is required. A webhook just sends the data when it’s available.

In this case the data is pushed to the WordPress site running ActiveMember360 automatically by ActiveCampaign.

The webhook is a way for ActiveCampaign to provide ActiveMember360 with real-time information. A webhook delivers data as it happens, meaning the most current data is available immediately.

So, this is the equivalent of being sent a new phone directory automatically every time someone is added to the directory, or their details change.

ActiveMember360 could use the ActiveCampaign API to ensure it is always working with the current data. However, as ActiveMember360 has no way of knowing when data has changed within ActiveCampaign it does not know when to make an API request for the current data, meaning it would have to continually send API requests to ensure all was current. A very inefficient process.

This makes webhooks much more efficient for this purpose than continual API requests.

When the webhook is executed it will make a HTTP request (typically a HTTP POST) to the ActiveMember360 WordPress site, and ActiveMember360 then updates the local contact data for immediate use.

Unfortunately, webhooks can make a lot of requests, i.e. HTTP POSTs, if a lot of changes occur within ActiveCampaign. The volume of HTTP POSTs received may cause all server resources to be consumed, and/or be considered a DDoS (Distrubuted Denial of Service) event.

ActiveCampaign Webhooks & ActiveMember360

In the case of ActiveCampaign, webhooks can be executed and HTTP POSTs sent either from within an automation using the Webhook option, or automatically by webhooks being triggered from ActiveCampaign events.

The event triggered webhooks are those defined in ActiveCampaign, Settings, Developer, Manage Webhooks. By default, ActiveMember360 automatically sets up a webhook in that area if within WordPress ActiveMember360, Webhooks is set to Yes/Enabled. These webhooks are configured to trigger whenever a contact is added or updated in ActiveCampaign.

The event triggered webhooks are totally controlled by ActiveCampaign. No third party vendor can change the behaviour of those webhooks.

ActiveMember360 uses the HTTP POSTs sent by event triggered webhooks to keep data current and to automatically trigger password generation for contacts

It is typically the HTTP POSTs sent from event triggered webhooks that can cause a flood of HTTP POSTs to the server hosting the WordPress website. That is because bulk updates of any kind to contact data can trigger these webhooks.

So, to avoid that situation configure ActiveMember360 to not use event triggered webhooks.

With event triggered webhooks switched off the current ActiveCampaign data should be pushed to WordPress using automation webhooks.

To do that ensure within WordPress ActiveMember360, Webhooks is set to No.

Then if either of the following are required:

  1. Generate a password
  2. Ensure contact data is current for a logged in user where it may have been manually changed within ActiveCampaign, or changed by a third party application, or changed by actions in an automation

use a Webhook URL set within an automation.

In both cases use the ActiveMember360 mbr_genpass module within the webhook URL as detailed here:

mbr_genpass

This option gives total control over when webhooks are used to send HTTP POSTs. Obviously, significant numbers of contacts should not be sent through the automation at the same time, as this could result in the same issues as using event triggered webhooks.

Please note where ActiveMember360 changes the contact data these changes are always current within WordPress and there is no need to use any webhook.

So, regarding the use of webhooks the choice is with the user of ActiveMember360.

Either use automatically configured webhooks which may result in high volumes of HTTP POSTs being sent to your server, or manually configure webhooks for more control.

Which IP Addresses are used to send ActiveCampaign webhooks?

ActiveCampaign does not currently publish a definitive list of IP addresses. However, based on examination of our log files, we have found the following IP addresses:


  • 23.20.225.34
  • 34.192.90.130
  • 34.192.144.26
  • 34.199.37.208
  • 34.205.102.133
  • 34.206.124.186
  • 34.226.103.188
  • 34.230.175.182
  • 34.236.93.175
  • 50.17.40.31
  • 52.7.228.32
  • 52.45.6.233
  • 52.45.183.46
  • 52.55.227.5
  • 52.72.254.82
  • 52.201.65.20
  • 52.201.65.208
  • 52.201.201.234
  • 54.83.71.25
  • 173.193.9.0/24

Please note that, as we do not control this list but are merely reporting our findings, this list is subject to change at any time.

How to pre-fill Gravity Forms radio buttons, checkboxes, dropdowns and multi selects

To prefill radio buttons, checkboxes, dropdowns or multi-select fields in Gravity Forms you will need to the filter hooks provided by Gravity Forms.

How to prefill a radio box:

In Gravity Forms, open the form builder, select your radio field, click the “Advanced Tab”.

Enable “Allow field to be populated dynamically” and fill in for example “callback_mbr_db_radio”.
You can enter whatever you want but dashes and white spaces are not allowed.

In your child theme’s functions.php, you need to insert the following PHP code.

/* 
 * "callback_mbr_db_radio" must match whatever you entered in "Advanced Tab" of your form.
 */
add_filter( 'gform_field_value_callback_mbr_db_radio', 'mbr_populate_mbr_db_radio' );

function mbr_populate_mbr_db_radio( $value ) {
  return do_shortcode( '[mbr_db_radio]' );
}
</code>

How to prefill a checkbox:

In Gravity Form, open the form builder, select your checkbox field, click the “Advanced Tab”.

Enable “Allow field to be populated dynamically” and fill in for example “callback_mbr_db_checkbox”.
You can enter whatever you want but dashes and white spaces are not allowed.

In your child theme’s functions.php file, you need to insert the following PHP code.

/* 
 * "callback_mbr_db_checkbox" must match whatever you entered in "Advanced Tab" of your form.
 */
add_filter( 'gform_field_value_callback_mbr_db_checkbox', 'mbr_populate_mbr_db_checkbox' );

function mbr_populate_mbr_db_checkbox( $value ) {
  $arr_checkbox = do_shortcode( '[mbr_db_checkbox]' );
  $arr_checkbox = array_filter( explode( '||', $arr_checkbox ) );
  return $arr_checkbox;
}
</code>

How to prefill a dropdown:

In Gravity Forms, open the form builder, select your dropdown field, click the “Advanced Tab”.

Enable “Allow field to be populated dynamically” and fill in for example “callback_mbr_db_dropdown”.
You can enter whatever you want but dashes and white spaces are not allowed.

In your child theme’s functions.php, you need to insert the following PHP code.

/* 
 * "callback_mbr_db_dropdown" must match whatever you entered in "Advanced Tab" of your form.
 */
add_filter( 'gform_field_value_callback_mbr_db_dropdown', 'mbr_populate_mbr_db_dropdown' );

function mbr_populate_mbr_db_dropdown( $value ) {
  return do_shortcode( '[mbr_db_dropdown]' );
}
</code>

How to prefill a multi-selectbox:

In Gravity Forms, open the form builder, select your multi-select field, click the “Advanced Tab”.

Enable “Allow field to be populated dynamically” and fill in for example “callback_mbr_db_multiselect”.
You can enter whatever you want but dashes and white spaces are not allowed.

In your child theme’s functions.php, you need to insert the following PHP code.

/* 
 * "callback_mbr_db_multiselect" must match whatever you entered in "Advanced Tab" of your form.
 */
add_filter( 'gform_field_value_callback_mbr_db_multiselect', 'mbr_populate_mbr_db_multiselect' );

function mbr_populate_mbr_db_multiselect( $value ) {
  $arr_multiselect = do_shortcode( '[mbr_db_multiselect]' );
  $arr_multiselect = array_filter( explode( '||', $arr_multiselect ) );
  return $arr_multiselect;
}
</code>

How can I make pages available based on a “drip” schedule?

Scheduled or “drip” content release in ActiveMember360 is based on automated processes in ActiveCampaign.

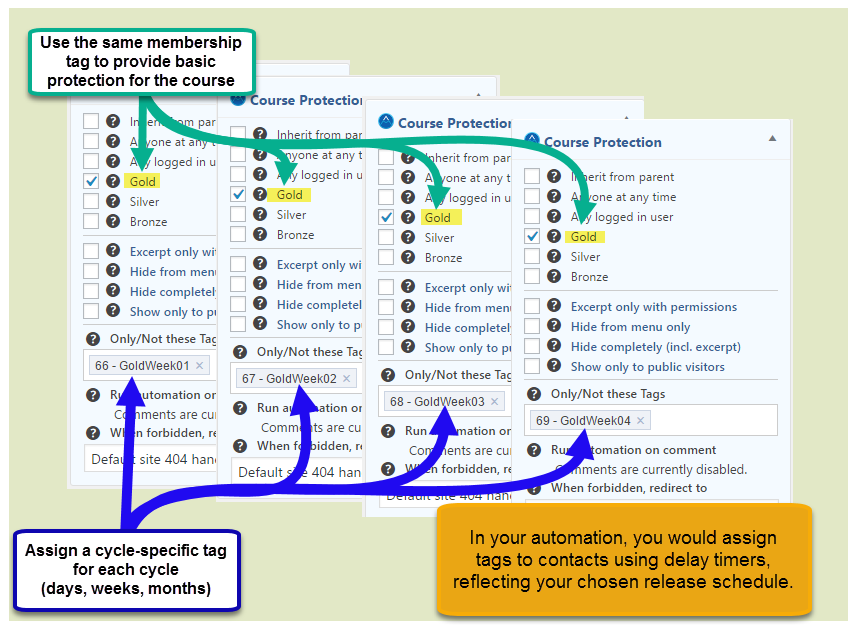
For this example, we’ll create a basic drip sequence for members of a membership level and we’ll use a sequence of four pages to be released over time.

Specifically: We’ll create a 4-page sequence for members of the “Gold” membership, where each page will be released in weekly intervals.

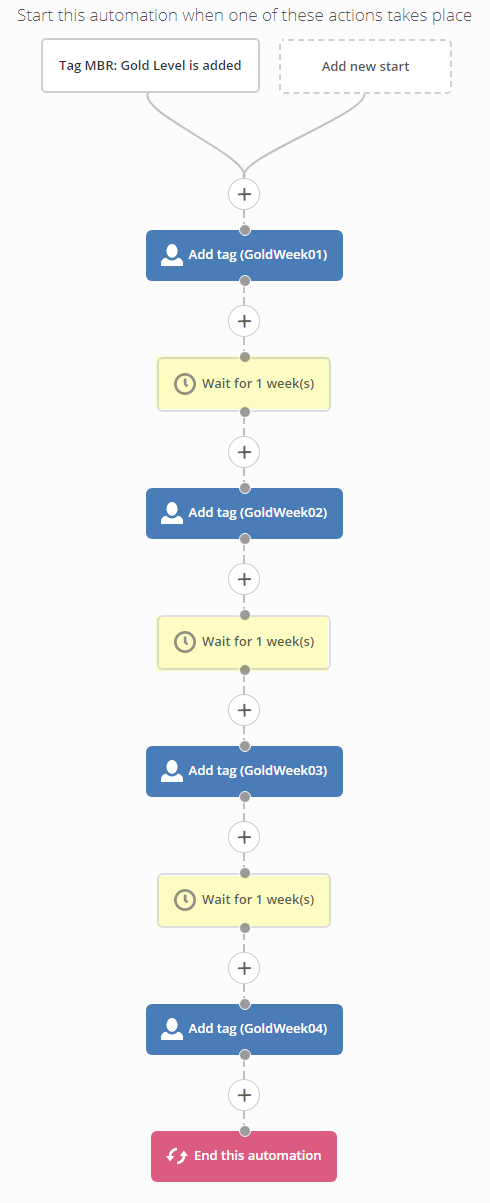
Our first step is be to create four “weekly” tags in ActiveCampaign, which we call “GoldWeek01”, “GoldWeek02”, “GoldWeek03” and “GoldWeek04”, respectively.

Next, we create a simple and straightforward automation which assigns the first weekly tag immediately and each of the remaining three tags in weekly intervals using automation timers.

This automation can be imported into your ActiveCampaign account using this link:  http://tplshare.com/O3P90kY

Once your tags and your automation have been created, it’s time to set the permissions on each of the four pages. Using the “Protection” metabox in your page editor, you would simply assign permissions based on the membership level (“Gold”) and one of the
weekly” tags for each of the four pages in the “Only/Not these tags” input field, as shown below:

I would like to make passwords less complex. Can ActiveMember360 do this?

Yes, it can.

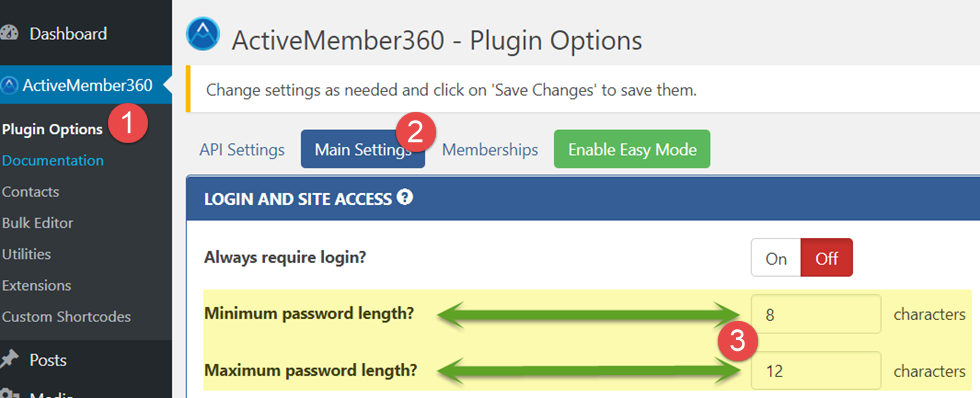
  1. You can set the minimum and maximum length of passwords using the settings found in “Plugin Options” -> “Main Settings”:


  2. Then, by adding a line similar to the following line to your wp-config.php file, you can specify any set of characters that you wish to allow:

    define(‘MBR_PASSWORD_BASE’, ‘ABCDEFGHabcdefgh01234*&^%$#@’);

    These characters will then be used when passwords are automatically generated by WordPress but will also be used to validate password changes entered by users.

Please read before submitting a ticket

If you have questions or concerns, or even if you just feel you need to confirm something, contact us any time. Since 2009, we’ve seen most issues and probably have a quick and easy way to help you out.

Before submitting a ticket, please ensure that you are up to date with both WordPress and ActiveMember360 updates.

To speed up our response, we’ll usually need to know the following things:

  • A description of the issue, as detailed as you can provided it.
  • Site URL and page where the issue can be observed.
  • WP admin login credentials, if the issue involves WordPress.
  • Login credentials for an affected user with which we can test the issue you’re experiencing.
  • If the issue involves your ActiveCampaign setup, please provide details relating to the automation used and/or your settings.

You can submit a support ticket on our support page or send us an email directly at amsupport (at) helpcenter360 (dot) com.

Can I set up a secure autologin with ThriveCart, JVZoo or ClickBank?

Beginning with ActiveMember360 version 1.2.17, secure autologins are possible using order validation of data facilitated by ThriveCart, JVZoo, ClickBank and DigiStore24’s “Thank You” page feature.

  • Each of these carts has a so-called “secret key” that will need to be entered / saved in ActiveMember360. To do so, click on “Plugin Options” in the main menu.
  • On the next screen, ensure that you have previously enabled “Advanced Mode“.
  • Then, click on “Main Settings” and scroll down to the “Security Options” section, near the bottom of the settings page.
  • If you haven’t already done so, enter at least one “Security Code“, which can be any sequence and length of characters of your choice.
  • If not already enabled, please ensure that the “Enable Autologin module” is set to “On”.
  • For each applicable cart, enter or copy/paste the respective “secret key“.

After completing the above steps, the autologin integration for these platforms will be ready to use.

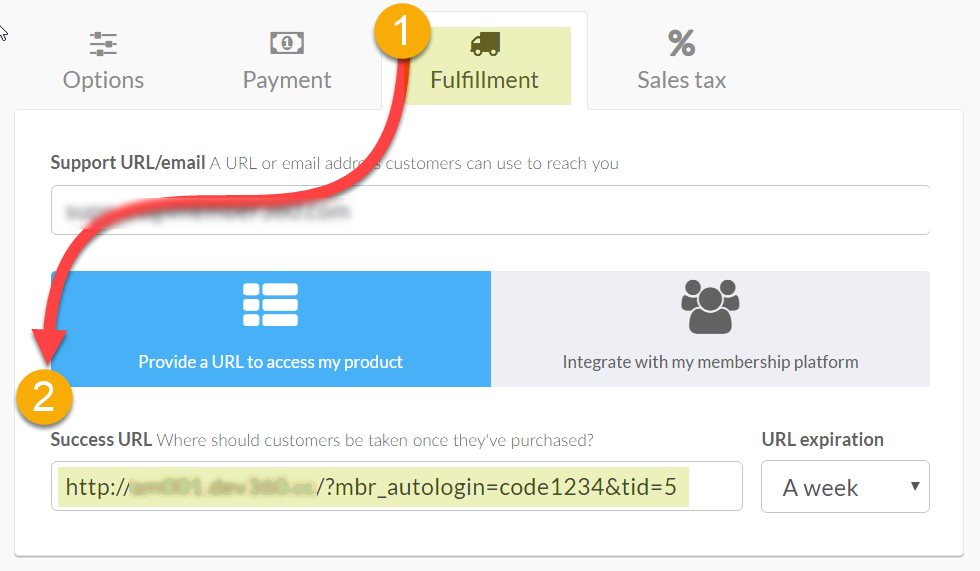
In ThriveCart, you can set your “Thank You” page settings for each product under the “Fulfillment” tab:

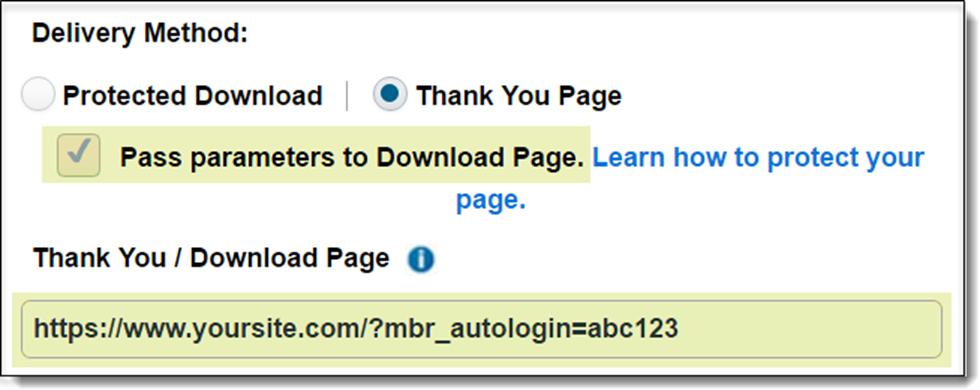
In JVZoo, your “Thank You” page settings will be found on the main product settings page, similar to the following:

In JVZoo, ensure that “Pass parameters to Download Page” is checked. In ClickBank, these parameters are passed by default.

In DigiStore24, your “Thank You” page settings will be found on the main product settings page, similar to the following:

The value entered for “mbr_autologin” will be one of the security codes that you entered / defined in ActiveMember360 in the “Security Options” section.

For additional information about the autologin module, please go to this page.

Increasing the WordPress Memory Limit

By default, WordPress reserves up to 40M memory for itself. Depending on the your chosen theme and the number of plugins used on your site, you can quickly run out of memory and be faced with a very slow running site.

Edit wp-config.php

To increase the amount of memory available to your WordPress installation, you will need to add the following instruction to in your wp-config.php file, located in your WordPress installation’s root directory:

define(‘WP_MEMORY_LIMIT’, ‘128M’);

If you are using WooCommerce on your site, we recommend increasing your memory limit to 256M, as follows:

define(‘WP_MEMORY_LIMIT’, ‘256M’);

Edit php.ini

When increasing the amount of memory available to your WordPress installation, please ensure that the amount of memory allocated to your server is at least or higher than what you’ve allocated to WordPress.

On most servers, the server memory limit is set to 64M or 128M. If you need to increase this limit, you’ll need to modify your server’s php.ini file, by changing the “memory_limit” setting, as follows:

memory_limit=256M

In some cases, your server configuration may allow you to make this change in your “.htaccess” file, as follows:

php_value memory_limit 256M

Contact Your Hosting Support

If you’re not comfortable making these changes or if you don’t have access to some of the files, please contact your hosting support. They will have access to files and the tools necessary to make these changes within a few seconds.

ActiveCampaign Webhooks / HTTP POST with CloudFlare

References:

CloudFlare blocks IP addresses known or perceived to be sources of malware or spam. The CloudFlare Firewall also detects web activity that it considers to be harmful to your site and blocks IP addresses linked to such activity.

Very often, webhooks without a referrer originating from the site itself can be considered illicit and result in the posting IP addresses being blocked. ActiveCampaign webhooks fall under the HTTP POST rules. Another “gotcha” are unknown or missing user agents where CloudFlare expects to see the name of the most common web browsers.

CloudFlare provides a mean to establish a so-called “Trust List”, enabling webhooks originating from ActiveCampaign to be “whitelisted”, enabling them to reach your site and be processed by ActiveMember360. In addition, CloudFlare lets one define so-called “Page Rules” which would allow ActiveCampaign webhooks to get past the security scans.

To add ActiveCampaign IP addresses to the CloudFlare “Trust List”:

(1) Go to your CloudFlare Firewall settings and click on the “Trust/Block IP List” tab.

(2) In the input field next to the green “Trust” submit button, enter the following IP addresses


23.20.225.34, 34.192.90.130, 34.192.144.26, 34.199.37.208, 34.205.102.133, 34.206.124.186, 
34.226.103.188, 34.230.175.182, 34.236.93.175, 50.17.40.31, 52.7.228.32, 52.45.6.233, 
52.45.183.46, 52.55.227.5, 52.72.254.82, 52.201.65.20, 52.201.65.208, 52.201.201.234, 
54.83.71.25, 173.193.9.0/24

and press the “Trust” button (Please note that this list is often changed / updated).

Next, go to your “CloudFlare Page Rules” settings. There, you will create a new rule for your site:

  • Dynamic Pattern -> http://yoursite.com?mbr=*
  • Additional settings:
    • Always Online -> Off
    • Browser Integrity Check (BIC) -> Off
    • Browser Cache TTL -> 300
    • Custom Caching -> Bypass Caching
    • Forwarding -> Off
    • Performance -> Off
    • Security Level -> Lowest
    • SSL -> Off

I’m converting from another membership system, can the old WP passwords be used?

Yes, there is a way to capture passwords so that users can keep their old passwords.

While there are several ways to achieve the same result, we recommend the following:

  • Import all users from the “old” WordPress site into your ActiveCampaign campaign account.
  • If their “old” passwords are known, include them in the import file.
  • If their “old” passwords are not known, ensure that the import file sets the value of the “Password” field to the special value: #$mbr$capture$#
  • If you didn’t set that value in the import file, you can do it later using an ActiveCampaign “Bulk Edit” action.
  • Once the relevant contacts have been assigned that special value to their “Password” field,  WordPress users logging in will have their password verified against their WordPress password first and, if it matches, the password will be stored in ActiveCampaign as their new “master” password and their login will be authenticated.

NOTE:

In all examples, we use #$mbr$capture$#. However, you can add a prefix or suffix of your choice, as long as the #$mbr$capture$# string portion remains intact, such as:

  • random678#$mbr$capture$#
  • #$mbr$capture$#random345
  • random246#$mbr$capture$#random975